
Make a Quilt with Fabrics from India. A Free Baby Quilt Project
- prarthanadickson

- Apr 28
- 6 min read
The Sugar and Spice Quilt
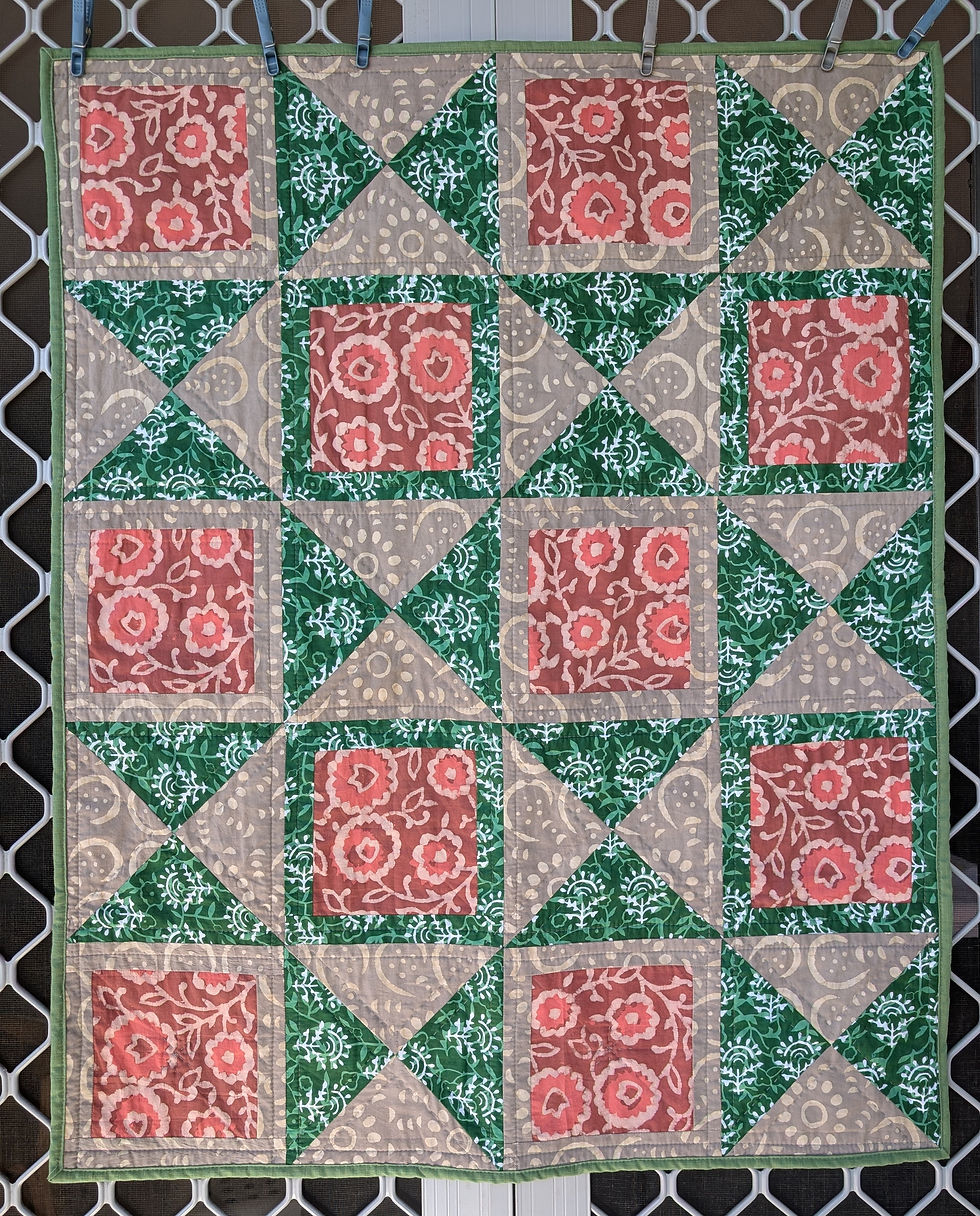
This project first appeared in Quilt Stories India Magazine, as a two-part project in issues 25 & 26
Sugar and Spice is a gorgeous, simple, 3-fabric baby quilt. It comes together quickly and is a great weekend project. It finishes at 32” by 40”, which means you will only need an extra 1m or 1yd of fabric for the backing. So, the whole quilt can be made with roughly 3m of fabric in total. To make this baby quilt extra special, I decided to work with my favourite fabrics for this project – Indian cottons!
Indian cottons are great for quilts. India has a great history of quilts - from whole cloth quilts (like Rajasthani quilts), or Kawandi style quilts, to sari quilts, patchwork quilts, etc. They’re usually made with cotton inside them. Lately, handmade quilting has been on the rise globally, and it has been lovely to see some of these traditional textile arts come back into focus. My favourite aspect about this is the possibility of combining art forms - using Indian cotton fabrics in my patchwork style quilts.
While most handmade quilts are made from cotton, globally, the most popular fabric for quilting is known as “quilting cotton”, which is a particular type of cotton fabric. Quilting cotton typically is a little heavier and has a higher thread count than cottons that are used to make clothes, but not as heavy as upholstery fabrics. This is so they are durable and can withstand lots of usage and washing. Indian cottons that are used in quilts are a much lighter fabric and the weave is looser than typical quilting cottons. But the cottons are still remarkably durable and make lovely light quilts that are perfect for warm weather snuggles. I like working with Indian cottons for baby quilts as they turn out so very soft. They’re almost like muslin swaddles, but with a little bit more substance – which can be great for those pram walks or for a little extra warmth in the cot as they can be tightly tucked under cot mattresses.
If you have only ever worked with quilting cottons, then there are a few things to keep in mind when it comes to working with Indian cottons:
Like other cottons, there is still a wide variety of cottons you can get in India – my favourites are block printed cottons. It isn’t a one size fits all as each of those are different and feel different. For this quilt I used Indian batiks and printed Jaipuri cottons. But this is simply a matter of personal preference so pick what you like!
Indian cottons often use natural dyes that can run when put in the wash – to avoid disappointment, it’s best to prewash them and take precaution when washing your finished quilts.
The weave in the fabrics can be a little looser, so I like to reduce the stitch length on my sewing machine, just to increase stability.
Finally, because the fabrics are quite light weight, it can mean they are particularly “suggestible”, in other words - prone to stretching and warping. This can make it difficult to get your points to match and seams to line up when working with a patchwork quilting pattern. To limit this, make sure to only press down with your iron with some gentle pressure, instead of running it along your fabrics and blocks. You can also use starch. Alternatively, you can embrace it! It will make your quilts not quite perfect, but that just makes them extra unique.
So, let’s get started!
Requirements

Fabric requirements assume that all fabric is at least 42” wide (i.e., Width of Fabric or WOF, from selvedge to selvedge is 42”).
We will be using a ¼” seam allowance throughout.
Also recommended:
1. A cutting mat
2. A rotary cutter with a fresh blade
3. A quilting ruler
4. Pencil or other fabric marker
Fabric | Labels | Yard/Metre |
|---|---|---|
Focus Fabric (pink) | FF | 1/2m or 1/2yd |
Colour A (Grey) | A | 3/4m or 3/4yd |
Colour B (Green) | B | 3/4m or 3/4yd |
Backing | 1m or 1yd | |
Binding | 1/2m or 1/2yd |
There are two layout options possible for this quilt. But the difference is super subtle (can you spot it?)


Cutting Instructions
Focus Fabric (FF) | [10] 6.5” by 6.5” squares, label F |
Colour A | [10] 9.5” by 9.5” squares, label A [12] 1.5" by 8.5", label A1 [12] 1.5" by 8.5", label A2 |
Colour B | [10] 9.5” by 9.5” squares, label B [8] 1.5" by 8.5", label B1 [8] 1.5" by 8.5". label B2 |
This quilt is a super-fast quilt, but much of that speed comes from reducing our cutting time. We will use the double fold method for this. Let’s prepare for that. Unfold your fabric A, press and re-fold so the selvedge edges are lined up. Smooth out any creases! At this stage don’t worry too much about getting the raw edge of fabric along the sides matched up. Often fabric from shops is not evenly cut. Make sure you don’t warp or stretch your fabric as you press and fold. Repeat, so you now have four layers of fabric. This is the double fold. Preferably do this step on your cutting mat. Take your folded fabric to your cutting mat carefully.

With your largest quilting ruler, line up the top and bottom so they’re straight and parallel. Measure 9.5” from the edges. If your edges are uneven (most are!), then leave a margin and cut so that you will get at least 9.5” from the remaining length. You can re-trim this strip to size by carefully flipping it over or moving your ruler over carefully, and cutting along the opposite edge - it feels a bit weird to bend around like that, but it ensures neat straight cuts. Cut two 9.5” WOF strips using this method. Repeat for fabric B.

Using the same method with fabric FF, cut out two 6.5” WOF strips; cut those strips into ten squares.
Sometimes the selvedge is not straight because of the stretchy nature of the fabric. Try not to force it to be straight and go with the natural fall of the fabric.
Let's make some blocks!
This quilt features two types of blocks - the Framed Blocks and the hourglass quarter square triangle blocks. First let’s tackle the framed blocks:
Take [2] A1 strips and [1] F squares. Sew the strips to the left and right of the F square. Repeat until you've used all the A1 strips - 6 blocks in total.
Next, take [2] A2 strips and sew it to the top and bottom of the block created in step 1.

There should be 6 framed blocks created with this colour combination.
Repeat this process with the remaining [4] F squares and B1 and B2 strips. You should have [10] framed blocks measuring 8.5” square in total – 6 in Colour A and 4 in Colour B “frames”.
Next, let's tackle the Quarter Square Triangles or QSTs. For this we first start by making HSTs or Half Square Triangles.
Take [1] A square [1] B square. Draw a diagonal on the back of one of the squares. Pin to secure the two pieces of fabric together.
Sew two lines on either side of the marked diagonal line with a ¼" sewing margin.

Next, STOP! Press your freshly sewn double square to get rid of any fabric bulges. Remember to Press down gently with the iron instead of running it over the fabric.
Cut along the diagonal. Open along the seam and press the Half Square Triangle blocks. Repeat for the other sets; you should have 10 HSTs measuring approximately 9" square - do not trim at this stage.

Take 2 HSTs and lay them on top of each other so that that the colour 2 part of the HSTs are opposite each other, and the sewing line is 'nested'.
Draw a diagonal line on the back of one of the HSTs from perpendicular (i.e. in the opposite direction) to the HST seam.
Pin to secure the two pieces of fabric together. Sew two lines on either side of the marked diagonal line with a ¼" sewing margin. Press your block.

Cut along the diagonal. Open along the seam and press your hourglass QSTs.
Trim your QSTs to measure 8.5" square. The best way to trim is to use a square ruler, find the centre of your QST and line it up with the 4.25" mark on your ruler. If your ruler has a diagonal line marking on the ruler, make sure you align that diagonal line with the diagonal seam of your QST. You should have [10] QSTs, [6] framed blocks in Colour A frames, and [4] framed blocks in Colour B frames.
Quilt Assemble - Let's assemble our quilt!
Next, we’ll put our blocks together. We’ll make five quilt rows, and each row will be made up of 4 alternating blocks – 2 QST blocks and 2 framed blocks. Sew these rows together to finish your quilt-top! You can choose a layout that works well for you, or use the mock-up shown below as a guide.
ROW 1:

ROW 2:

Rows 3 - 5:

Once you’ve sewn all your rows together, press your seams as desired. Pressing seams is important for smooth quilting. Aaaaaand you’re done with your quilt top! Finish this quilt off as desired.
Hope you had fun making this quilt with me!


Comments