
Spring Breaking Through (a.k.a "Abby's Quilt"), a Beginner Quilt
- prarthanadickson

- Sep 21, 2020
- 7 min read
Updated: Dec 21, 2021
Making the Quilt Top
Hi everyone. I absolutely LOVE this pattern. It's great whether you are sewing by hand or using a sewing machine. I've written this post with tips on how you would hand sew this quilt-top.
There is a section at the bottom with definitions for some of the words. If you get stuck, scroll down to the bottom!
The Pattern

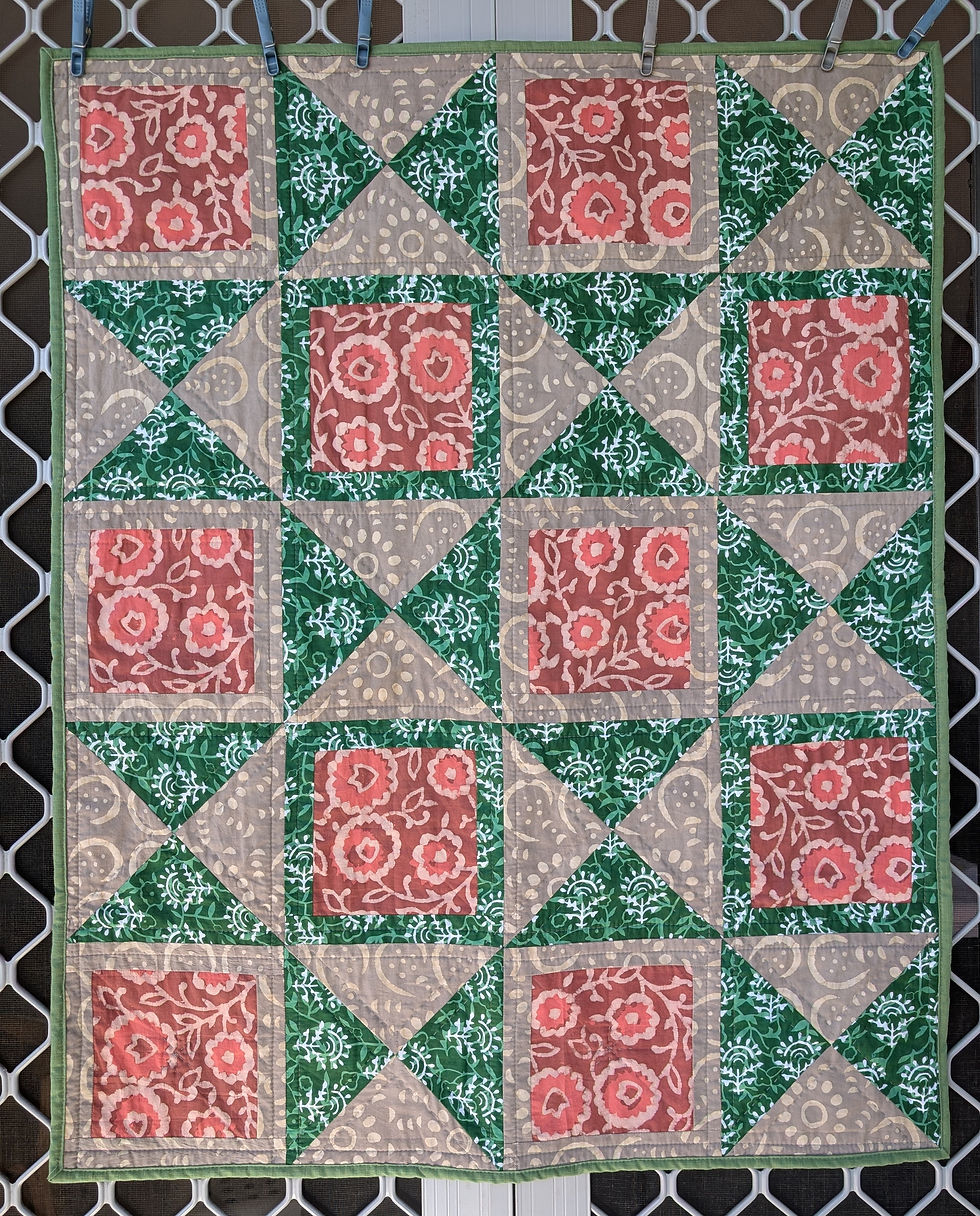
I've drawn up a pattern that should be easy enough to follow even for beginner quilters. The finished quilt is 4.25 ft by 6.25 ft, which isn't a standard quilt size, but I think it works quite well as a single bed (twin) quilt.
You can purchase this pattern on ETSY .
I've used bright colors and mostly floral patterns in my fabric selection for this quilt, with a white border throughout. Overall it gives the impression of bursts of color interspersed with a solid white or "snow". But that is completely up to you! All of the fabric for this project was from Fabriclore. They have some wonderful prints, and they ship internationally!
Quilt patterns are often written using "blocks". This is what we will use here as well. The small blocks in this pattern are 3" by 3" (3.5" by 3.5" with sewing margins); these make up the larger 9" by 9" (9.5" by 9.5" with sewing margins) quilt blocks. In this quilt, we use eight nine-patch* colorful quilt blocks*, seven 9" square blocks of one type of fabric, with the border fabric, and colorful border tiles around the quilt.
This blog includes instructions on how to hand sew the nine-patch quilt-blocks, plus pictures of other stages of the quilt-top. You can purchase the full PDF pattern on Etsy.
Fabric
This quilt is made using 8 FQs* + yardage* for background, backing and binding, but it is super scrap friendly! Please note: if you want to use fabric that you have at home instead of purchasing fresh fabric, please read the instructions on making the different blocks to get more accurate measurements.
Cutting the Fabric
First things first: make sure all fabric has been pre-soaked to get rid of excess color and to account for any shrinkage. Do iron them flat once they're dry! If you are machine stitching, it is important that you cut your fabric as close to the measurements given; if you are hand-stitching (this blog post is for you!) make sure you have a trusty fabric marker that you can use - I use a pencil. Whatever you use, you need to be able to see the lines that you are drawing on the fabric. Draw lines on your fabric based on what the measurements should be in the finished version, and cut your fabric allowing for a sewing margin* that you're comfortable with. If you're unsure of what the measurements of the finished version should be, you can keep referring to the mock-up of the pattern and the information given). Remember - you will have more control over your stitching with hand-stitching and can make adjustments along the way as needed. I use at least a 1/4" sewing margin* throughout the project. If you prefer a bigger margin, you may want to purchase more fabric.
Colorful Fabric; pre-washed and sorted

Making the nine-patch quilt blocks
Cut fabrics C1 to C8 into two strips that are 3.5" wide along the width of your fabric. Then cut each strip in half. (Or 4 strips 3.5" wide from each FQ). If your fabric is 42" wide, then you will have 4 strips that are 3.5" wide and 21" long for each type of fabric. You should have at least 32 strips (4 strips * 8 types of printed fabric).

One benefit of this pattern is that you can use more of one type of fabric, and don't have to use each fabric (C1 to C8) equally. If you (like me!) want to use an equal number of squares from all 8 types of fabric, then you will need 18 squares from each.
Take one strip of fabric. Make sure you've ironed out the creases! On the wrong side of the fabric, mark a line 1/4" in from the edge of the fabric on both sides using a ruler and pencil/fabric marker. The space in between both lines should be 3" exactly. (If your fabric hasn't been cut to exactly 3.5" wide, the markings should still be exactly 3")

Take two strips marked this way and pin them together along the marked lines - I recommend pinning them about 3" between each pin. The lines will keep your sewing straight and steady, and the pins ensure the fabric doesn't double up/bunch up anywhere creating bulges in the fabric.


Sew along the marked line. For hand-stitching, I like to use a backstitch*. A running stitch is not as secure as the backstitch. If you're comfortable with something different, then you can use that; what's important is that the stitch is secure.
Once you've made this double strip, press the fabric open*. To protect the print, it's better to iron the wrong/reverse side of the fabric. You can press the seams open or to one side*. I prefer to press the seams to one side so the neat part of the backstitch is visible and the other side is tucked away, but again this is a matter of personal preference. Take a third strip and add it to this double strip. This strip can be one of the other two that's used or a different print from the first two (i.e. your three-tile-strip could be C3-C6-C3 or C1-C5-C3, both options are great, and a wonderful way to explore individual creativity). Create three-tile-strips (as shown in the mock-up below) with the remaining printed fabric strips. You should end up with 10 of these, with some fabric leftover.

These strips don't need to be in any particular pattern, so feel free to mix and match as much as you want!

Press all the seams (open or to one side) and set aside. Using your ruler and pencil (or another marker), mark lines 3.5" apart from the top of each strip. You should be able to mark 5 such lines, to make 6 pieces. (Alternatively, I like to mark a line 1/4" from the top, then 3" pieces from this marking with a 1/2" margin in between each piece).

You can see from this photo that my border lines are slightly off - that's okay! I normally check and re-draw my border lines as needed. Once you're comfortable with the sewing process, you could wait to draw the border right before you're ready to sew along that line.
Each piece created this way will be 9.5" by 3.5" (this includes the 1/4" sewing margin). We'll refer to these as three-tile-strips. You should have about 60 of these three-tile-strips. Don't forget to press the seams!


Take three of these three-tile-strips and sew them together lengthways to create a nine-patch quilt block. Each quilt block should be about 9.5" by 9.5" (9" by 9" with a 1/4" margin on all sides).

Mix and match 24 of these strips to make 8 nine-patch quilt blocks. The remaining strips will be used in the border tiling. Extras can be used in the backing fabric.
Press the seams and keep these 8 blocks aside till you're ready to assemble the quilt!

Putting It All Together
Here are some photos of the quilt assembly! Check out the PDF pattern for full instructions.

Here I am, posing next to my finished quilt-top. Pardon the mess in the background and the poor quality of the photo!

Some Possible Modifications
Quilt patterns don't always suit everyone's needs! I've modified most patterns I've used to suit my fabric and my preferences. Here are some possible modifications which would work quite well with the above pattern. If you like one of these, you will need to adjust your fabric requirements accordingly.
4 rows instead of 5 (modifies the quilt to 4.25 ft by 5.5 ft). This means that you will need to make 6 nine-patch quilt blocks and 6 square blocks.
Use plain (unprinted) fabric for the 9" by 9" squares. These can then be embroidered with sayings or other pictures or left plain.
Use 4 types of printed/color fabric for the small blocks (tiles) instead of 8 and repeat the pattern more frequently.
In my version, I will be using lightly printed fabric for the square blocks; this will give me the flexibility of embellishing some of them and leaving others blank.
Whatever modification you choose, make sure your overall measurements are altered accordingly.
Happy Sewing!
*Some Definitions
If you are a beginner quilter, then a lot of this might be Greek to you! In this section, I will explain what different quilting words/phrases mean. If you would like to know what other phrases mean, please leave a comment below!
Quilt Blocks: Making a quilt, it's easy to get overwhelmed by the enormity of the project. So we start small, with quilt blocks. These are smaller recurring blocks (usually a square) of similar patterns that are then placed next to each other and sewn to make the quilt. In this pattern, there are two types of blocks - there is one block that has nine small squares stitched together, and one block which is one fabric that has been cut to size.
Nine-patch quilt block: This means nine pieces of different fabric stitched together into a three-by-three square.
Sewing margin: This is the bit of fabric that is leftover between where you are stitching and the end of the fabric. All items of clothing have a margin of some sort; if you're not sure what I'm talking about, reverse one of your tops and look along the seams. In most Indian clothes, the margin can be quite large so the clothes can be loosened or tightened as needed. For our quilting project, we will use 1/4" sewing margin.
Wrong side: The reverse side of the fabric.
Backstitch: Here is a helpful video on the backstitch.
Press the fabric open/press the seams open or to one side: Here is a helpful video on pressing seams
FQ/Far Quarter: A Quilting pre-cut you can purchase which is equal to 0.25m
Yardage: Fabric by the meter or by the yard


Thanks Phil for sharing this!Thank you Kuttyma for your perseverence in keeping up your skill and creativity.The art of your needle work and sewing machine stitching teeny weeny pieces with mathematic perfection... I wish your gran'ma were alive to see the display of these skills they too cherished.I believe the cloth vendor also would be happy to see the product .Amma.